You can find complete source code on Droids on Roids’s GitHub repository.
Since iOS 9 and OS X El Capitan, Apple has started supporting content blockers. This brings us ad blocking and many other interesting possibilities. In fact, you can i.e. block content easily which is inappropriate – especially useful when you share your phone with kids. Each blocker is Safari extension and has to be an app. Right now, the most popular are – of course – ad blockers, like Crystal and Purify. Let’s try to create custom Safari content blocker.
First of all, we should know how standard ad blockers work. They’re usually really huge CSS that remove unnecessary content and fills blank spaces with proper content, which makes it more readable. Unfortunately, that makes web browser slower. With latest major versions of their operating systems, Apple introduced new way to filter content. It’s much faster and can be used not only with Safari stricte. It works with each web view, i.e. included in different apps, like Alien Blue.
Note: Apps containing content blocking extensions for Safari on iOS are available only on 64-bit devices, due to performance limitations of 32-bit devices.
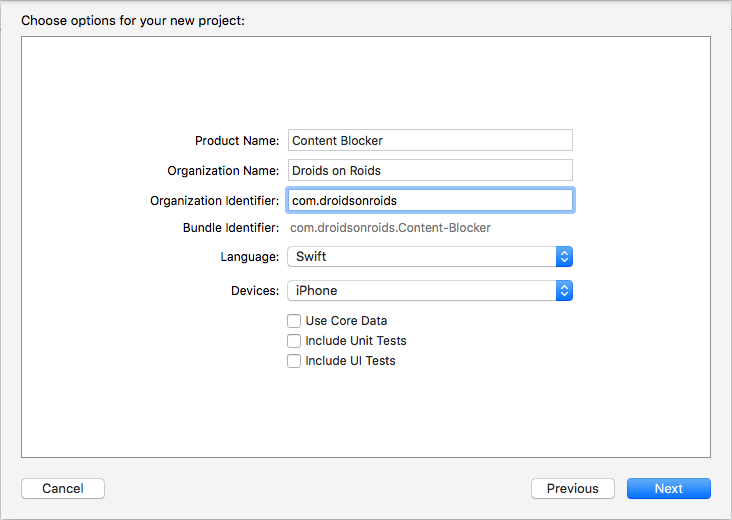
Ok, let’s get to the point. Start Xcode (version 7.0 or higher) and create new Swift project. Single View Application will be sufficient. Name it (in the example I typed just Content Blocker), choose Swift as language and press Next. Choose desired location and right after creating the project – create new target. Choose File > New > Target and select iOS > Application Extension > Content Blocker Extension. Name it Safari Extension.
When Xcode asks you to activate new scheme, you should choose Cancel to avoid some mess.
Now take a look in Project Navigator for your freshly created group named as extension. Inside you’ll find three files.

- blockerList.json is the list of items to block. It’s JSON and can be easily modified.
- ActionRequestHandler.swift is generally just one function that lets this extension work.
- Info.plist looks almost the same like app .plist. Settings at all.
In fact the most interesting for us is first of them all. Take a look and find first, really simple rule:
[
    {
        "action": {
            "type": "block"
        },
        "trigger": {
            "url-filter": "webkit.org/images/icon-gold.png"
        }
    }
]
Want to check it out? Run your app, go back to springboard and find Settings, then Safari > Content Blockers. Last step is to flick the switch next to your app’s name. Find Safari and navigate to webkit.org. You’ll see that WebKit logo in left top corner is missing. That’s because of the rule in blockerList.json. Voilà!
It’s time to understand how and why this JSON works. Syntax is quite simple, it’s just array full of dictionaries, where each dictionary is a single rule.
That’s how rule set looks like:
[
    {
        "trigger": {
            …
        },
        "action": {
            …
        }
    },
    {
        "trigger": {
            …
        },
        "action": {
            …
        }
    }
]
Trigger defines what properties activate a rule. Action defines what the engine should do when a resource is matched by a trigger.
According to webkit.org these are valid fields:
The valid fields in the trigger are:
- “url-filter” (string, mandatory): matches the resource’s URL.
- “url-filter-is-case-sensitive”: (boolean, optional): changes the “url-filter” case-sensitivity.
- “resource-type”: (array of strings, optional): matches how the resource will be used.
- “load-type”: (array of strings, optional): matches the relation to the main resource.
- “if-domain”/”unless-domain” (array of strings, optional): matches the domain of the document.
Currently, the action object has only 2 valid fields:
- “type” (string, mandatory): defines what to do when the rule is activated.
- “selector” (string, mandatory for the “css-display-none” type): defines a selector list to apply on the page.
Let’s say we want to block the footer on Microsoft’s webpage. Ridiculous? Maybe, but why not. We just need to investigate microsoft.com source code and find how can we identify the footer. At the moment it has class mscom-footer.
Try to add new rule. Let’s start from action:
"action": {
    "selector": "div[class*='mscom-footer']",
    "type": "css-display-none"
}
That means selector should contains (that’s why *=, not just =) class named mscom-footer. Action’s type is css-display-none, which means display:none is going to be added to this tag.
Note: simple equals = is the most intuitive, also powerful are above mentioned *= and ^= which mean starts with.
We can also match AND/OR operators this way:
"selector": "[class='foo'],[class='bar']" // class="foo" OR class="bar"
"selector": "[id='foo'][class='bar']" // id="foo" AND class="bar"
Now we should add basic trigger for url-filter (make it works on every single site; that’s not really optimized, we should avoid regular expressions like ranges, *, ?, +, .). Finally it should look like this:
{
    "action": {
        "selector": "div[class*=\"mscom-footer\"]",
        "type": "css-display-none"
    },
    "trigger": {
        "url-filter": ".*"
    }
}
Unfortunately when you run the app, then switch to Safari and navigate to microsoft.com, will see that footer is still visible. Why?
Apparently it looks like content blocker is not reloaded every time when you run your app. We can fix it manually (by going to Settings and disabling, then reenabling content blocker), but more powerful way is doing it on every start programmatically. Open ViewController.swift and add this two lines to viewDidLoad() function:
let bundleId = "com.droidsonroids.Content-Blocker.Safari-Extension"
SFContentBlockerManager.reloadContentBlockerWithIdentifier(bundleId, completionHandler: nil)
Well, that’s first time when we typed something not being JSON 🙂 Don’t forget to import SafariServices and change bundleId to your extension’s identificator.
At the moment that’s all. Now you know more about content blockers in iOS 9, and I hope you’ll try to dive into the subject a little more after reading this post. You can need some more regular expressions examples. Unfortunately there is no more official Content Blockers documentation that mentioned webkit.org and this little example on developer.apple.com.
You can find complete source code on Droids on Roids’s GitHub repository.