Android Developer beginner. Step #1 – Interacting with the UI
Mateusz Budzar

This is the first article from a series which point out the most crucial parts in the beginning of Android development. Step by step.
There are a lot of “how to start” articles that describe the very first steps of being an Android Developer. Like how to download Android Studio and create our first project. Even I wrote one some time ago (you can find it here).
They all are very useful, but let’s imagine that we started programming on Android again. We downloaded Android Studio and build the “Hello world” project on our device. Cool, but what’s next? What should we learn now?
I was there before, most of us were. I tried to learn Android on my own. I was programming a lot — one thing after another. But I didn’t know what’s important. That’s why I want to start a series of articles which point out the most crucial parts in the beginning of Android development. Step by step. I wanna help you to find an answer on “what’s next” question and describe it a little bit.
This is the list of the topics that I would like to touch:
- Interacting with the UI.
- Creating lists
- Creating custom views
- Taking pictures
- Downloading data
- Storing data
- Make it delightful with Material Design
So. Shall we?
You’ve build the “Hello world” project, right?
Let’s look around before we’ll add some lines of code.
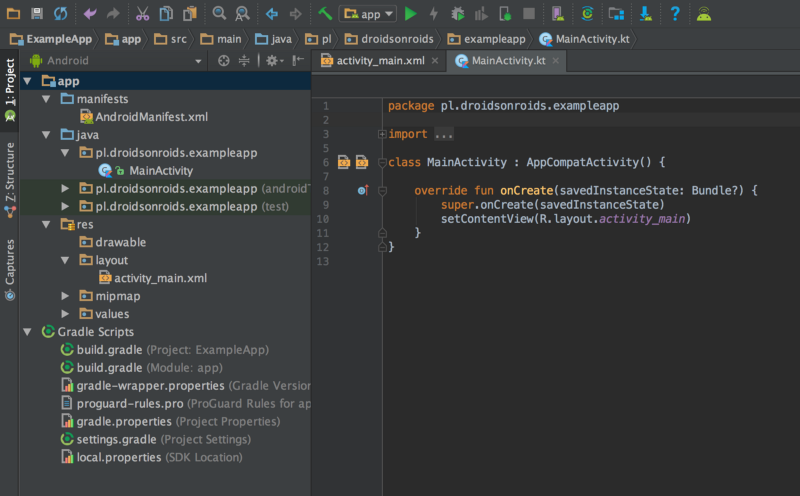
Figure 1. New Android project
For now, try to focus on just two files — MainActivity.kt and activity_main.xml. The first one is a Kotlin class and it’s inheriting from the AppCompatActivity class. We’ll handle the AppCompat prefix later in other posts, now just look at the Activity.
What is an Activity?
You can think of the Activity as a kind of a window in which you place the UI components like texts or buttons. You can read more about Activity here.
The Activity.onCreate() method is called when the Activity is starting. There you should do your initialisations like binding the UI that you’ve created.
NEED A SUCCESSFUL TEAM?
We’re 100% office based team with 7-years’ experience
in mobile & web app development
How to create the UI components?
You can create the UI component right in the code or you can do it in the XML file. For now, I would recommend the second option — it’s just easier.
Remember the activity_main.xml file? Let’s dig deeper into that file.
UI components must be arranged in some way. For example in one line horizontally/vertically or one component should be in some relation with the other one (i.e. on the left). So how we place them in a proper manner?
Layouts! Boom!
In Android, we have a couple of Layouts. For example, LinearLayout which places views in one line — one after another.
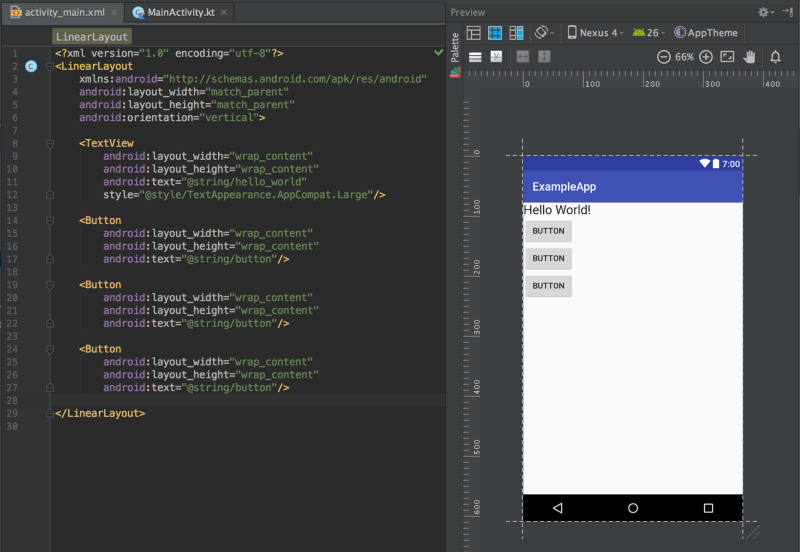
Figure 2. Example of LinearLayout in vertical orientation
In Figure 2 you can see the simple example of LinearLayout. First of all we set the orientation to vertical using android:orientation attribute and then just place inside the layout views that we want to show on the screen. You’ve probably already noticed how simple is to add some UI components, like texts or buttons, to our newly created layout.
There are other layouts out there like RelativeLayout, FrameLayout and ConstraintLayout, but we won’t cover all of them in this article. If you want to know more about them, just leave me a comment and we’ll figure something out. Especially the last one, ConstraintLayout, is a bit more complicated than the others. So I’ll just leave here two more sources that you can check:
- Build a Responsive UI with ConstraintLayout — straight from Android documentation,
- Constraint Layout: A New Hope — an excellent talk from a friend of mine.
Cool, so we have the Activity class and we’ve created the UI in the XML file. The last thing to do is to bind the activity_main.xml file to our Activity.
How to bind the layout with the Activity?
We do this by just one line of code — Activity.setContentView() method.
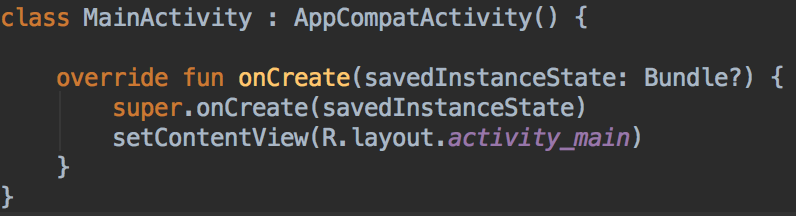
Figure 3. Binding the Activity with the layout using setContentView method.
This method takes as a parameter a resource id or a view. In this example we pass the resource id.
What are the resources?
Let’s look at the project structure and the res folder.
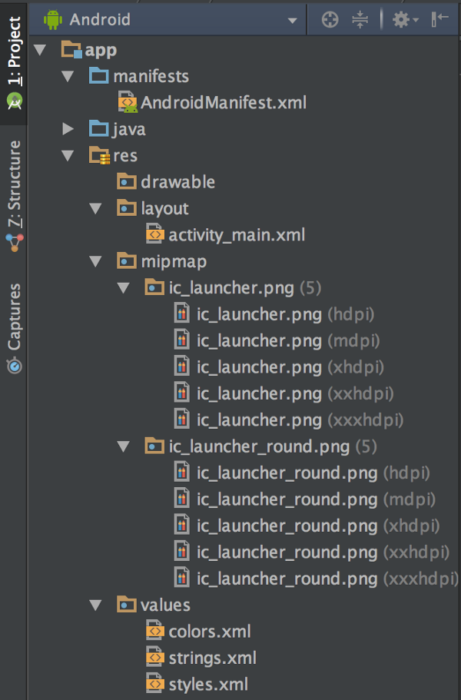
Figure 4. A common Android project structure.
We can find there folders like drawable, layout, mipmap values and you can create much more. We put there any resources like images, colors or strings.
Why we do that? Basically to be able to manage them for the whole application project for different devices or configurations.
Let’s imagine that we have a text in english and we hardcoded it in our layout file. How we handle the case when we want to spread our app for the Polish users? How we’ll translate that text?
If we kept this value in the strings.xml file we could easily add a translation. The same applies for others, if we keep our image in a proper drawable folder, we can add the bigger or smaller ones for other type of devices.
How we create resources for different configurations?
Let’s stay with the text example. If we’ve hardcoded “Hello World” in the layout we can use a shortcut to extract it to the strings.xml. Click the Alt + Enter keys and choose “Extract string resource”.
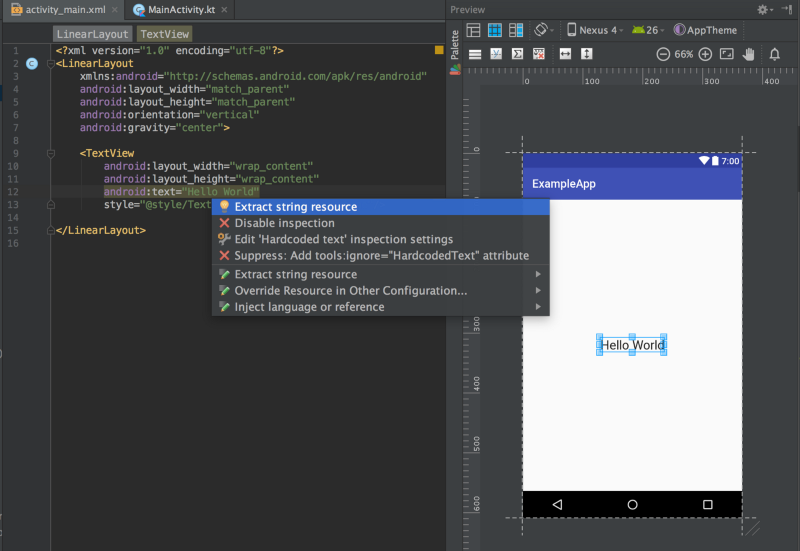
Figure 5. Extracting a string
Then enter the key name, like hello_world. Great, now let’s create the same string resource but in polish.
Right click on the res folder and create a new Android resource as it’s shown in Figure 6.
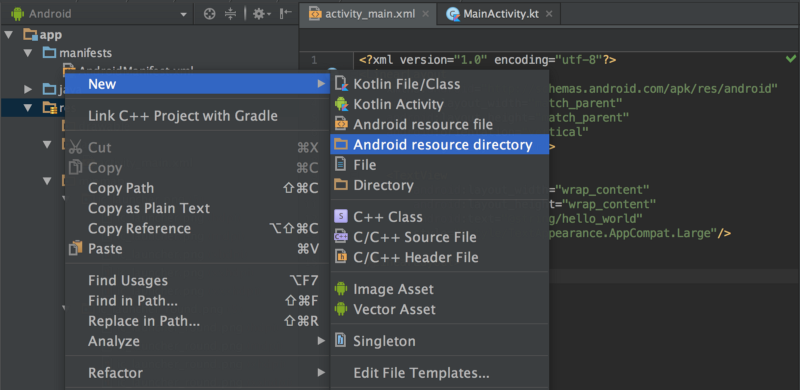
Figure 6. Creating a new resource folder
The strings.xml file is in the values folder so we have to create a polish version of it.

Figure 7. Adding a suffix in values folder for polish values like strings. If you couldn’t see created folder switch the showing mode of project structure from Android to Project.
Right click on the values-pl folder, create a new values resourece file and call it the same — strings.xml.
Inside we put the same string key and a translation for it.
Figure 8. Polish translation for the Hello World.
Notice that this strings file has a polish flag. You can now run the app, change the system language to Polish and see that the text will change.
There is also a simpler way to manage translations. You can use Translations Editor.
The same applies to others types of resources. If you want to create a layout file, you put it to layout folder, image to drawable and so on. You can find more about providing resources and accessing them here and here.
Ok, so we know how to create some resources. The way we passed the layout resource to the Activity.setContentView() method was a bit weird though.
What the R.layout means?
Simply the R class holds every resource id. Following the documentation:
When your application is compiled,
aaptgenerates theRclass, which contains resource IDs for all the resources in yourres/directory. For each type of resource, there is anRsubclass (for example,R.drawablefor all drawable resources), and for each resource of that type, there is a static integer (for example,R.drawable.icon). This integer is the resource ID that you can use to retrieve your resource.
Cool, so we pass the layout resource to the Activity and now we can use all of the views from that layout.
How to use views from layout in the Activity?
To do that first of all we have to add an id attribute to the particular view.

Figure 9. Adding id attribute to the TextView
We added text_hello id to the TextView. Now we have to find the view which using this id inside the Activity. We do that with the method called, wait for it… Activity.findViewById().

Figure 10. Finding the TextView and changing the text. The text is highlighted because it should be extracted to the strings.xml file.
As you can see we found the View by R.id.text_hello id. Then we had to cast it to the TextView because the Activity.findViewById() method returns a View. After that we changed the text. Run and check if it’s working!
We can also use the Kotlin Android Extensions if we want to get rid of the Activity.findViewById() methods.
Let’s say that now we want to go to the next screen after some interaction from a user.
How to get inputs from a user?
What is the simplest way to go to the next screen? I guess that just by clicking the button. So let’s add a button to our layout.
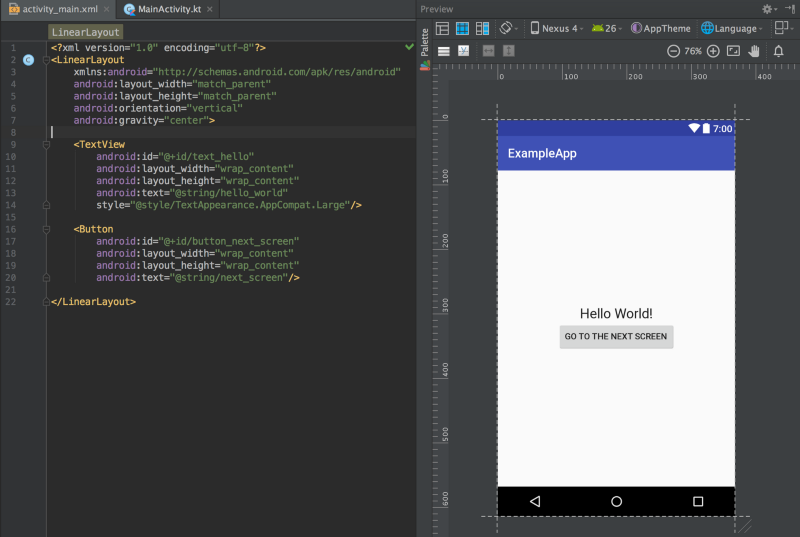
Figure 11. Adding a button to the layout
Now we have to find a button and set a click listener on it. As a parameter to the View.setOnClickListener() (Button inherits from the View) method we pass the implementation of the interface View.OnClickListener which has just one method — onClick(). Our implementation of the interface will be called each time the user clicks the button.
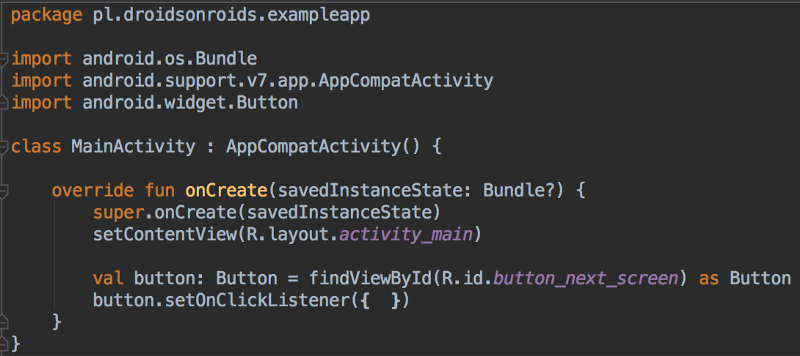
Figure 12. Setting the on click listener on a Button
We have an access to a button inside the Activity and we are ready to handle the click events.
How to start another Activity?
Fortunately, it’s not that difficult. For this purpose we use Activity.startActivity() method. The only parameter which we have to pass it’s a kind of intention to which Activity we want to go.
But before we do that, let’s create a new Activity.
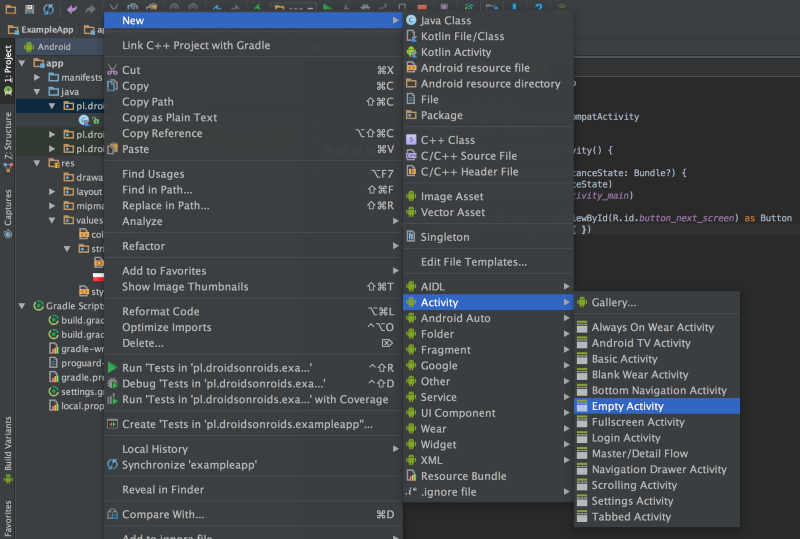
Figure 13. Creating a new Empty Activity
Let’s call it AnotherActivity.
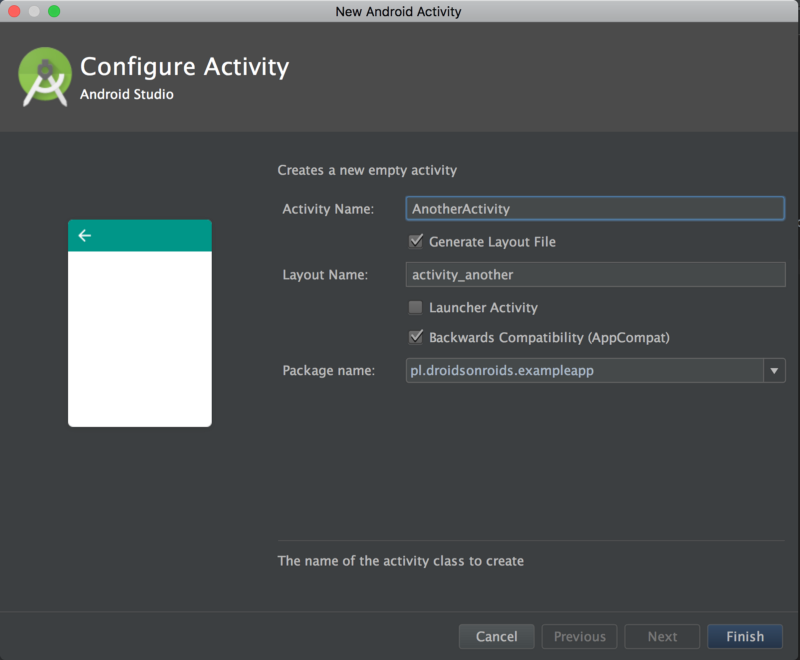
Figure 14. Setting a name for the new Activity
The layout file will be created automatically and also the Activity will be added to the AndroidManifest.xml file.
Last thing we have to do is to implement the on click listener method.
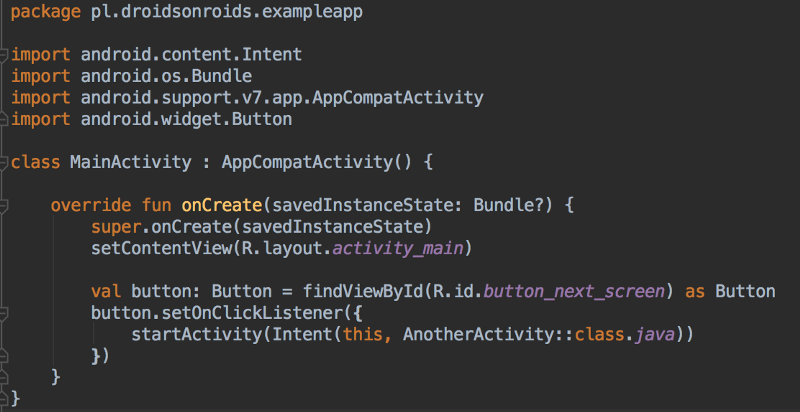
Figure 15. Starting new Activity
Other helpful resources
- How to support multiple screen sizes?
- What are density-independent pixels?
- A more expanded example of a simple UI and how to react on a different User inputs.
Wrap-up
That’s it! We’ve learned a lot things here. Now you know what is an Activity, how to create the UI components, how to bind the layout with the Activity, what are resources, how to create resources for different configurations, what is an R class, how to use views in Activity, how to get a user inputs and how to start another Activity. Hope this tutorial was helpful and easy to understand.
If you have any suggestions of what’s missing or what can be changed, feel free to leave a comment.
In the next article, we’ll implement some lists. Stay tuned!
The post was written by Mateusz Budzar, Droids On Roids Android Developer. This and other articles of Mateusz you can find also on Medium
Ready to take your business to the next level with a digital product?
We'll be with you every step of the way, from idea to launch and beyond!
Ready to take your business to the next level with a digital product?
We'll be with you every step of the way, from idea to launch and beyond!